If you’re frustrated with the hassle of manually adding extra top padding to the hero section when the sticky header is activated to prevent content from being obscured, today you can resolve that issue once and for all.
In this article, I’m providing a plug-and-play, secure, performance-optimized JavaScript code snippet that leverages only the native Bricks selectors to immediately fix the problem we discussed above.
If you don’t want to learn why I created it or how it works, just go ahead and add the script to your site by following the steps in the relevant section; you’ll be all set.
However, if you want to learn why I made it and how it works, feel free to read the entire article; it’s fun.
Disclaimer: This code snippet is completely vibe coded, with manual checks and testing done. If you’re skeptical, you should do your due diligence before using it on your site or simply choose not to use it at all. I’ve done my best to make it safe, secure, and performant, and I use it in my projects as well, but please use it at your own risk as I don’t provide any guarantees.
Why I Created This Script?
I have been using Bricks since its early days, and I don’t often use sticky headers on my sites, but sometimes clients want them, and I can’t say no.
Using a sticky header in Bricks Builder is such a hassle because whenever you activate it, the hero section ends up underneath the header.
If you don’t activate “sticky on scroll“, the header just sits right on top of the website body, specifically, the hero section.
I remember the last time I used a sticky header on a large client site with tons of pages.
I had to manually add extra headers to all the templates, like singles, archives, and custom-built pages, which was a huge pain.
Later, I started making a class to add extra padding on top of the hero section and assigned this class to all the templates and pages, which was a little more convenient.
But I wasn’t satisfied.
I needed a more robust, automated solution because I started using sticky headers on my agency and store websites recently, as I wanted to use the latest frosted glass or glassmorphism effect on the header, which is cool.
So, I thought, why not create a permanent solution with my vibe coding skills (which I learned while building my first full-fledged micro saas product) to fix this issue without digging into manual work at all?
I wanted a fully automated solution.
After two days of trial and error, lots of iterations, and implementing all my ideas, I ended up with a JavaScript snippet that does it all automatically, without even touching a single line of code; exactly as I wanted.
Now, I can simply plug this script into all my and my clients’ projects and forget about manually adjusting hero section padding altogether, which is truly a time saver.
How Does This Script Work?
So, here is how this script works when you activate it:
- At first, it checks if the sticky header without sticky on scroll is activated or not. If it finds that it’s activated, then it automatically runs.
- It dynamically calculates the current sticky header height to use as a token context in the next step.
- Then it automatically adds top padding exactly equal to the calculated header height on top of the existing hero padding; no more, no less.
Benefits of using this script
- Unlike any other solutions available out there, it’s just a plug-and-play solution. It leverages the Bricks native selectors to work without any manual configurations.
- You don’t need to manually update your header or hero section selectors in the this code snippet.
- You also don’t need to add any extra CSS or assign any selectors to the dedicated sections to make it work.
- Plus, you don’t need to change the top padding of the section manually to prevent the sticky header from obscuring your content; you can keep it as is.
Disadvantages of Using This Script
- It completely depends on Bricks’ native selectors, like .brx-sticky to run, .on-scroll to stop running, and #brx-content > section:first-child to inject the top padding into the hero section. So if they change any selector in the future (which I hope they won’t), the script will stop working until you update the latest selectors.
- On initial page load, when the script assigns top padding to the hero section, it’s delayed by a fraction of a second due to its dynamic nature. This causes the hero content to visibly shift layout from zero padding to header height padding.
If you want to fix this, you can simply hide the hero section content momentarily to let the page load and layout shift happen behind the scenes, then show it after the shift is done. I also have a code snippet for that if you need it.
How to Add This Script to Your Website?
Here is the full code snippet you need to add to your website.
Please make sure to read the prerequisites just below the snippet before using it.
(() => {
  /**
   * @author Wasim Akram
   * @link https://bricksism.com/auto-adjust-hero-section-spacing-for-sticky-headers/
   * @version 1.0.0
   * Description: Automatically adjusts hero section spacing to accommodate sticky headers in Bricks Builder.
   * Usage: Plug and play - no manual configuration needed.
   */

  // Bricks native selectors (do not change):
  const sw_headerSelector = '.brx-sticky'; // Sticky header (Bricks default)
  const sw_heroSelector = '#brx-content > section:first-child'; // Hero/first section (Bricks default)

  let sw_header = null;
  let sw_hero = null;
  let sw_originalPaddingTop = null;

  /**
   * Initializes header and hero references and stores hero's original padding.
   * This prevents accumulating multiple paddings and ensures safe repeated calls.
   */
  function sw_initElements() {
    sw_header = document.querySelector(sw_headerSelector);
    sw_hero = document.querySelector(sw_heroSelector);

    if (!sw_header || !sw_hero) {
      // Warn for missing Bricks native structure (shouldn't happen unless template missing)
      console.warn('Sticky header or hero section not found.');
      return false;
    }

    if (sw_originalPaddingTop === null) {
      // Get the initial padding-top value of the hero section only once
      const computedStyle = window.getComputedStyle(sw_hero);
      sw_originalPaddingTop = parseFloat(computedStyle.paddingTop) || 0;
    }
    return true;
  }

  /**
   * Updates the top padding of the hero section to clear the sticky header.
   * - Adds header height to original hero padding.
   * - Resets to original if the header is in "on-scroll" state.
   */
  function sw_updatePadding() {
    if (!sw_header || !sw_hero) return;

    // When .on-scroll is present, revert to original padding
    if (sw_header.classList.contains('on-scroll')) {
      sw_hero.style.paddingTop = `${sw_originalPaddingTop}px`;
      return;
    }

    // Otherwise add sticky header height to original padding
    const headerHeight = sw_header.offsetHeight;
    sw_hero.style.paddingTop = `${sw_originalPaddingTop + headerHeight}px`;
  }

  /**
   * Main handler: ensures elements exist and updates padding as needed.
   */
  function sw_onUpdate() {
    if (sw_initElements()) {
      sw_updatePadding();
    }
  }

  /**
   * Throttled handler for scroll/resize to avoid layout jank.
   */
  let sw_ticking = false;
  function sw_throttledUpdate() {
    if (!sw_ticking) {
      window.requestAnimationFrame(() => {
        sw_onUpdate();
        sw_ticking = false;
      });
      sw_ticking = true;
    }
  }

  // Run on page load, scroll, and resize:
  window.addEventListener('load', sw_onUpdate);
  window.addEventListener('resize', sw_throttledUpdate, { passive: true });
  window.addEventListener('scroll', sw_throttledUpdate, { passive: true });
})();
Code Snippet Changelog:
## Changelog for Sticky Header Hero Padding Adjuster

### [1.0.1] – 2025-08-25
#### Fixed
- Renamed the header `.sticky` class to `.brx-sticky` to maintain compatibility with Bricks 2.0.2.

### [1.0.0] – 2025-08-22
#### Added
- Released: Sticky Header Hero Padding Adjuster.
Prerequisites Before Using This Script:
Before adding this script to your site, you need to do two things.
1. Sticky Header Activated: Make sure your sticky header is activated and properly set up in the Bricks header template settings.
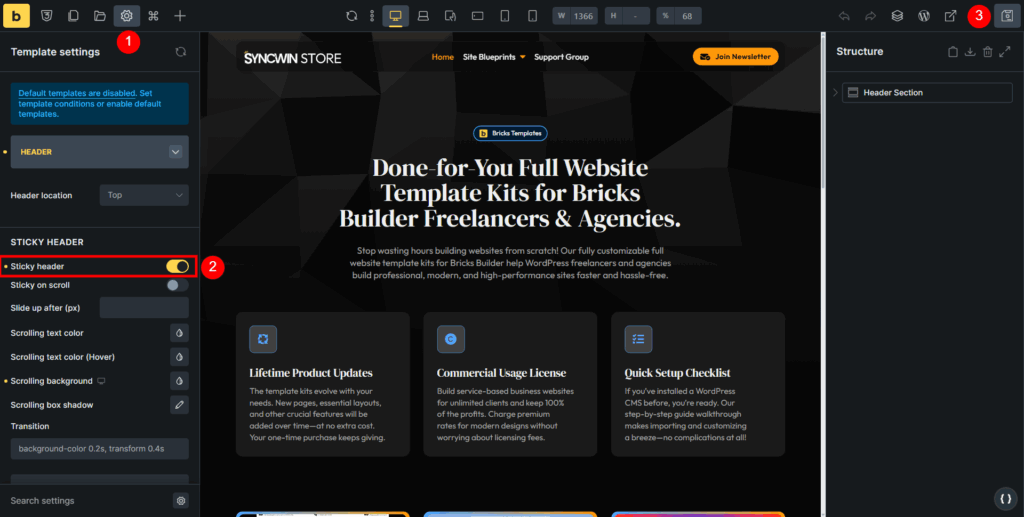
2. Code Snippet Plugin Installed: You should have a code snippet plugin (e.g., FluentSnippets or Scripts Organizer) installed and activated. This is where you will safely add the JavaScript snippet without modifying core theme files.
In this tutorial, I’ll use FluentSnippets because it’s free, although I personally use Scripts Organizer, which is a paid plugin.
Step-by-Step Process:
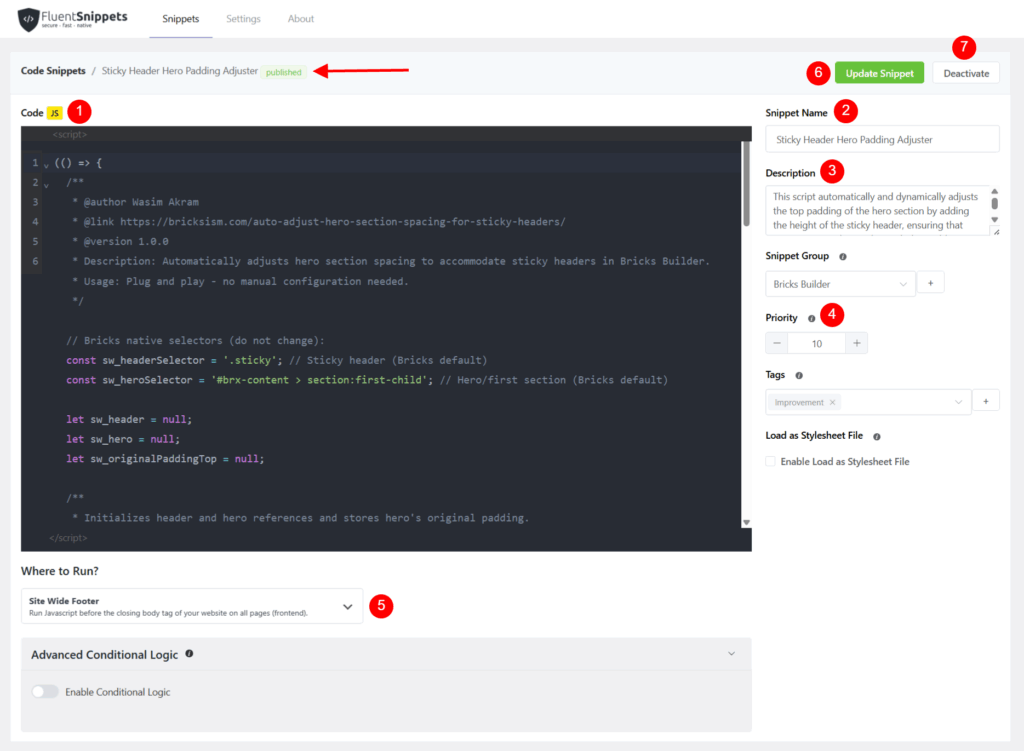
Step 2: Access the FluentSnippets
Open your WordPress Dashboard and click on the “FluentSnippets” menu from the admin panel.
Step 2: Create a New Snippet
Click the “New Snippet” button to add the script provided in this article, then select “Scripts” from the available radio options.
Step 3: Enter Snippet Name and Description
Add a name (e.g., Sticky Header Hero Padding Adjuster) and description (if needed) to remember the purpose of this snippet.
Step 4: Copy and Paste the Code
Paste the JavaScript code snippet you copied from the above section.
Step 5: Assign the Location to Inject the Script
In the “Where to Run?” section, select “Site Wide Footer” to inject it before the closing body and click the “Create Snippet” button.
Step 5: Activate the Script
Once it’s ready, just hit the “Activate” button to run the script on your site.
That’s all!
Now, your sticky headers won’t sit on top of your hero section because this script dynamically adds the necessary spacing to keep everything looking normal.
Conclusion
In this article, I provided you with a plug-and-play code snippet to automatically adjust the spacing of the hero section when the sticky header is enabled, and also showed you how to add that script to your site step-by-step.
If you have any suggestions or want to contribute to making this snippet more robust, feel free to comment below.
Also, if you want me to create custom features or fixes for your Bricks-specific sites, feel free to get in touch with me either through my agency website or via Facebook Messenger to discuss further.
Lastly, if you find this post valuable, consider sharing it with your fellow Bricks users. And if you have any questions or concerns, please drop a comment in the section below.
