If you’re looking for a simple yet powerful way to display the total post count of any published post or custom post type on the frontend of your Bricks Builder website, this tutorial is for you.
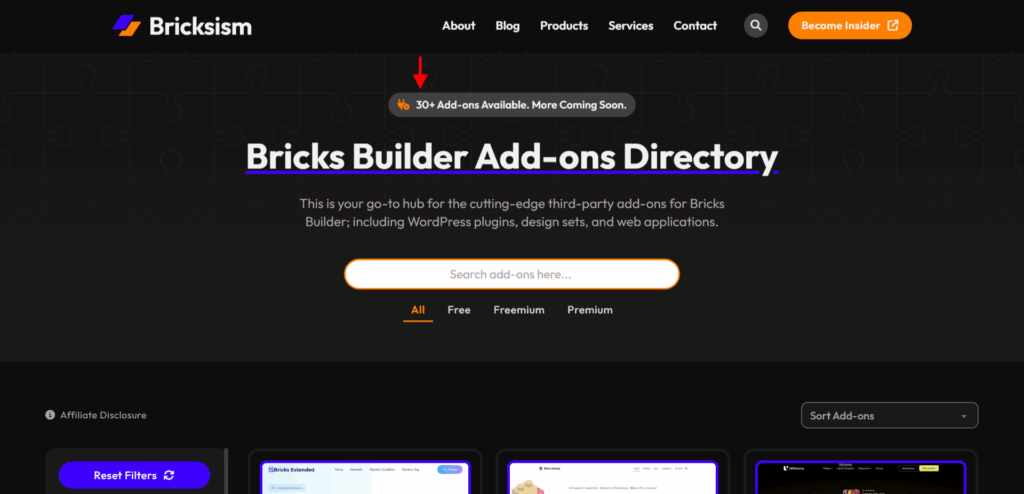
For example, The result should be “30+ Add-ons Available. More Coming Soon.” as a screenshot below.
30 is just a representational number; so the number will keep increasing or decreasing dynamically as you add or delete posts.
And all these will happen automatically without any manual intervention of any kind once you set up the system as per this tutorial.

I’ll share a clean, optimized PHP function snippet that registers a custom function to dynamically count the post type you choose, and then walk you through, step-by-step, how to customize it so it works with any post type.
This includes native WordPress posts, WooCommerce products, or other custom post types you’ve registered using plugins like Meta Box, ACF, ACPT, or anything else.
By the end of this guide, you’ll know exactly how to drop the function into your site, tweak it for your needs, and display a live, automatically updating post count anywhere in Bricks Builder, without touching your theme’s core files.
So, if you’re ready to make it work for your own setup, let’s dive in!
TL;DR: Key Highlights
Display the total published post count for any post type in Bricks Builder with a custom PHP function; works for posts, WooCommerce products, or any custom post type, with easy step-by-step customization.
- Display Total Blog Post Count with a PHP Snippet (Quick Setup):
If you just want to display your total number of published blog posts right on your Bricks Builder page, simply copy the provided code snippet into your favorite code snippet plugin (set it to PHP) and activate it. That’s all you need! - Add the Dynamic Tag in Bricks Editor:
Open the Bricks editor and paste this dynamic tag { echo:sw_post_count_total } into any text box or field that supports dynamic data and save the changes. Now, your published blog post count should instantly appear wherever you placed the tag.- Note: Be sure to remove the extra spaces before and after the text from the tag I shared above.
- Customize for Other Post Types (Optional):
Want to show the total count for a different post type, like WooCommerce products or custom post types created with ACF or Meta Box? Follow the full article for an easy step-by-step guide to tweak the function for any post type you want.
That’s it! No need to go through the whole article if all you want is a quick, hassle‑free way to display the blog post count only.
How & Why Did I Come Up with This Solution?
First, let me share with you how I came up with this idea and what my specific use case was; however, if you just want the result, feel free to skip this section entirely.
I had been working for several days on my Bricks Builder Add-ons Directory, aiming to list all available add-ons in the market properly organized by various essential taxonomies.
A key requirement was to display the number of add-ons (which is a custom post type I created using my favorite Meta Box plugin) that are published, so users would always stay updated.
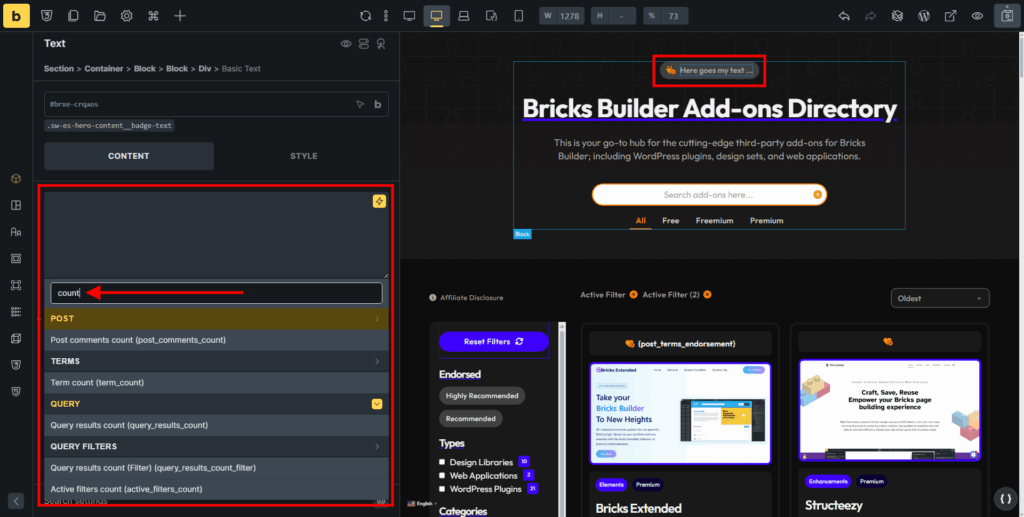
I decided to dig deep into the default Bricks dynamic data, hoping to find a way to display this post count on my directory page.
Unfortunately, as you can see in the screenshot below or check out the official docs, there was no dynamic tag available to achieve this.

Note: However, if I’m mistaken and you know of a native dynamic tag in Bricks that can do this, please let me know; I’d much prefer a built-in solution first.
Then I turned to my favorite AI platform, Perplexity.
I explained exactly what I wanted and asked it to analyze my requirements as well as the official Bricks docs to create custom dynamic tags, and then generate a working PHP function that could deliver this feature.
After some back-and-forth conversation and many rounds of trial and error, it finally provided code that worked perfectly.
However, I was still concerned about the security and cleanliness of that code since it’s never a good practice to inject snippets into a live site without ensuring they’re safe.
As a non-developer with a basic understanding of PHP but good knowledge of HTML, CSS, WordPress, and Bricks Builder, I used my favorite code assistant tool, Trae (which I primarily use for Vibe Coding), to run prompts that refined the snippet, securing it and adding essential comments so anyone could understand what it does and how it works.
Once I got confirmation based on best practices that the code was safe, I started using it on my site.
If you want to use this solution for your own projects, please do so cautiously and with your own due diligence.
How to Add a Code Snippet Using a WordPress Plugin?
To add the code snippet, you have two main options: you can either insert the code directly into the functions.php file of your Bricks child theme, or, my preferred method, you can use a third-party snippet management plugin instead.
In this tutorial, I’m using FluentSnippets, a free plugin developed by the same WPManageNinja team that’s behind popular WordPress tools like Fluent Forms, FluentCRM, and more.
That said, feel free to use any other similar plugin you’re comfortable with, such as Code Snippets, WP Code, WPCodeBox, or my go-to premium options like Scripts Organizer or Advanced Scripts.
Step-by-Step Process:

Step 1: Install & Activate FluentSnippets
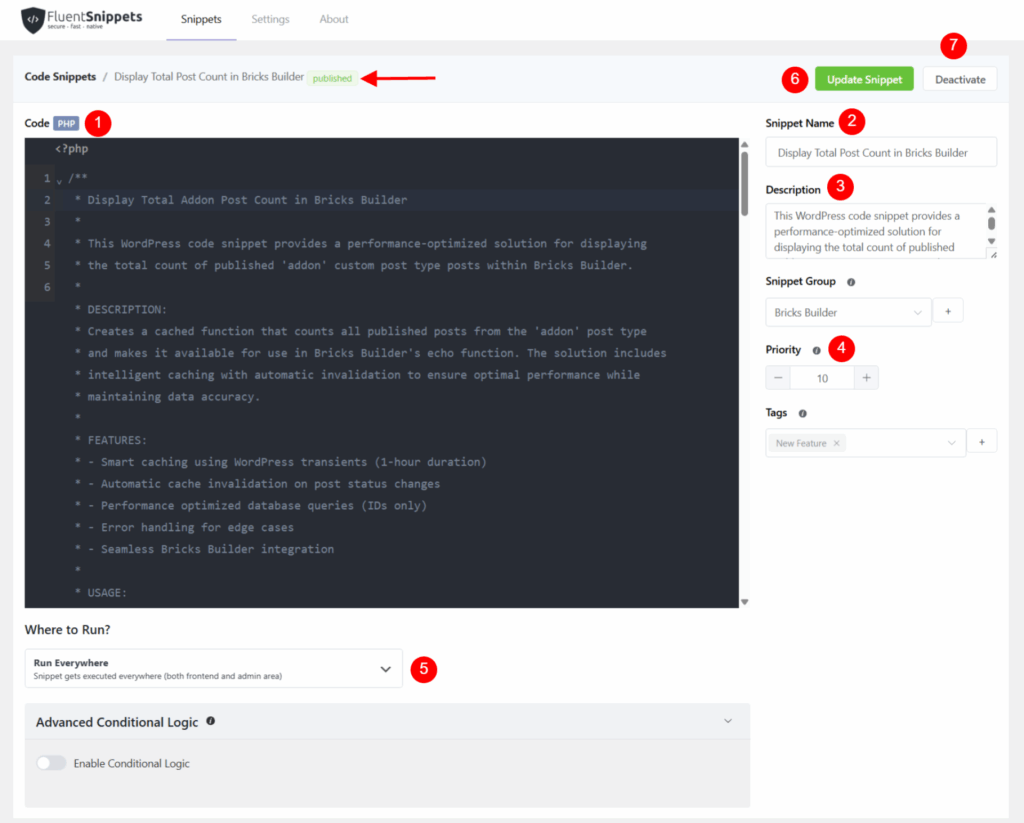
Install and activate FluentSnippets from your WordPress plugins directory. Now, access it by clicking the “FluentSnippets” menu from the admin menu panel of the WordPress Dashboard.
Step 2: Create a New Snippet
Then, click on the “New Snippet” button to create a new code snippet. This brings up the dashboard as seen in the screenshot above.
Step 3: Enter Snippet Name and Description
Give your snippet a clear name (e.g., Display Total Post Count in Bricks Builder), and write a description so you’ll remember its purpose later.
Step 4: Copy and Paste the Code
Copy and paste the following PHP code into the editor and select PHP from all the available options.
Customize everywhere a comment says “CUSTOMIZE” is where you update the function name, cache key, and post type to fit your specific use case (e.g., ‘addon’, ‘portfolio’, ‘event’).
Pro Tip: The code snippet below is fully editable, so you can tweak it on the fly to match your needs, and then simply copy it using the copy icon in the top‑right corner.
/**
 * Display Total Post Count in Bricks Builder (Generic Version)
 *
 * DESCRIPTION:
 * Creates a cached function that counts all published posts from the specified post type and makes it available for use in Bricks Builder's echo function. The solution includes intelligent caching with automatic invalidation to ensure optimal performance while maintaining data accuracy.
 *
 * USAGE:
 * Add this code to your theme's functions.php file or as a code snippet.
 * In Bricks Builder, use: { echo:sw_post_count_total }
 * (Replace 'sw_post_count_total' with your actual function name (e.g., sw_product_count_total) and remove the extra space from before and after the text)
 *
 * REQUIREMENTS:
 * - WordPress with the target post type registered
 * - Bricks Builder theme
 *
 * @author Wasim Akram
 * @link https://bricksism.com/display-total-post-count-in-bricks-builder/
 * @version 1.0.0
 */

// Main Function
function sw_post_count_total(): int { // CUSTOMIZE: Rename function (e.g., sw_product_count_total)
    $cache_key = 'sw_post_count_total'; // CUSTOMIZE: Update cache key (e.g., sw_product_count_total)
    $count = get_transient( $cache_key );

    if ( $count === false ) {
        $args = [
            'post_type'      => 'post', // CUSTOMIZE: Replace with your post type (e.g., product, event, portfolio)
            'post_status'    => 'publish',
            'posts_per_page' => -1,
            'fields'         => 'ids',
            'no_found_rows'  => true,
            'cache_results'  => false,
        ];

        $posts = get_posts( $args );

        if ( ! is_array( $posts ) ) {
            $posts = [];
        }

        $count = count( $posts );
        set_transient( $cache_key, $count, HOUR_IN_SECONDS );
    }

    return (int) $count;
}

// Bricks Builder Integration
add_filter( 'bricks/code/echo_function_names', function( $function_names = [] ) {
    if ( ! is_array( $function_names ) ) {
        $function_names = [];
    }

    $function_names[] = 'sw_post_count_total'; // CUSTOMIZE: Update function name (e.g., sw_product_count_total)

    return $function_names;
} );

// Cache Clearing Function
function sw_clear_post_count_cache( int $post_id ): void { // CUSTOMIZE: Rename function (e.g., sw_clear_product_count_cache)
    if ( get_post_type( $post_id ) === 'post' ) { // CUSTOMIZE: Replace post type (e.g., product, event, portfolio)
        delete_transient( 'sw_post_count_total' ); // CUSTOMIZE: Update cache key (e.g., sw_product_count_total)
    }
}

// Cache Invalidation Hooks
add_action( 'save_post', 'sw_clear_post_count_cache' ); // CUSTOMIZE: Update function name (e.g., sw_clear_product_count_cache)
add_action( 'delete_post', 'sw_clear_post_count_cache' );
add_action( 'before_delete_post', 'sw_clear_post_count_cache' );
add_action( 'trashed_post', 'sw_clear_post_count_cache' );
add_action( 'wp_trash_post', 'sw_clear_post_count_cache' );
add_action( 'untrashed_post', 'sw_clear_post_count_cache' );
Step 5: Set “Where to Run” to “Run Everywhere”:
Set Where to Run to “Run Everywhere” so your snippet works across both the frontend and backend (see screenshot above).
Step 6: Publish & Activate:
Click the “Create Snippet” button to save and then the “Activate” button to activate your code. Don’t forget to double-check that the snippet status is set to “Published.”
How to Customize the Code Step-by-Step?
To ensure the code works perfectly for your unique post type and is correctly referenced throughout your site, follow these steps:
Step 1: Choose Your Post Type
The post type determines which type of content you want to count (e.g., products, events, portfolio items, add-ons).
What to do:
- Locate the ‘post_type’ => ‘post’ line inside the main function.
- Change ‘post’ to your custom post type slug, such as ‘product’, ‘event’, ‘portfolio’, or ‘addon’.
Example:
'post_type' => 'product', // Change 'post' to: product, event, portfolio, addon, etc.
If you are making a product catalog, use ‘product’. For the directory of events, use ‘event’. For portfolio pieces, use ‘portfolio’, and so on. The post type slug should match exactly what is registered in your WordPress site!
Step 2: Update Function Names
Renaming the function ensures uniqueness and helps you stay organized, especially if you use several similar snippets.
Rename the Main Count Function:
- Change the function name from sw_post_count_total to something meaningful that matches your post type.
- This name is what you’ll call in Bricks Builder later.
Example:
function sw_product_count_total(): int { // Change to match your post typeIf you want to count products, rename it to sw_product_count_total. If you’re counting events, use sw_event_count_total, etc. In my case, I used sw_addon_count_total.
Rename the Cache-Clearing Function:
- Similarly, update the cache-clearing function to match your chosen post type, keeping things consistent and easy to find.
Example:
function sw_clear_product_count_cache( int $post_id ): void {This helps you instantly recognize which cache-clearing function applies to which post-counting process.
Step 3: Update All References
It’s important that all references and hooks use the updated function names and cache keys. This way, everything is connected, and the cache works as expected.
Update the Cache Key (inside the main function):
- Align the cache key with your function name for consistency and to prevent cache mix-ups.
Example:
$cache_key = 'sw_product_count_total'; // Match function name
Update Bricks Integration / Whitelist:
- Ensure that your new function’s name is whitelisted so Bricks Builder will recognize and allow you to use it with the echo tag.
Example:
$function_names[] = 'sw_product_count_total'; // Match function name
Update Post Type Check (inside the cache-clearing function):
- Make sure your post type check matches your chosen type so that the cache only clears when relevant posts change.
Example:
if ( get_post_type( $post_id ) === 'product' ) { // Match your post typeUpdate the Cache Key in the Clearing Function:
- Mirror the same cache key in your delete_transient call so it matches the one set above.
Example:
delete_transient( 'sw_product_count_total' ); // Match function name
Update Hook Reference:
- Make sure to update or rename the cache-clearing function name; you only need to change it once (in the first hook in your code snippet example), and then duplicate the same function name in every other hook call.
- You do not need to give each hook a different function name because they all call the same cache-clearing function.
Example:
add_action( 'save_post', 'sw_clear_product_count_cache' ); // Match clearing function name
add_action( 'delete_post', 'sw_clear_product_count_cache' );
add_action( 'before_delete_post', 'sw_clear_product_count_cache' );
add_action( 'trashed_post', 'sw_clear_product_count_cache' );
add_action( 'wp_trash_post', 'sw_clear_product_count_cache' );
add_action( 'untrashed_post', 'sw_clear_product_count_cache' );
Updating all references ensures your cache operates reliably and your integration with Bricks Builder remains seamless.
Dynamic Tag to Use in Bricks Builder:
After customizing your function and references, use the updated function name as a dynamic echo tag anywhere in Bricks Builder. I will discuss this in detail in the next section.
Example:
{ echo:sw_product_count_total } // I added some spaces before and after the text to make it visible in the frontend of this postReplace sw_product_count_total with whatever your final function name is (e.g., sw_event_count_total or sw_portfolio_count_total).
How to Add the Custom Created Echo Tag in Bricks Editor?
Now that your PHP function code is active site-wide, it’s time to display the count in a page or template built with Bricks Builder exactly where you want it.
Step-by-Step Process

Step 1: Open Bricks Builder:
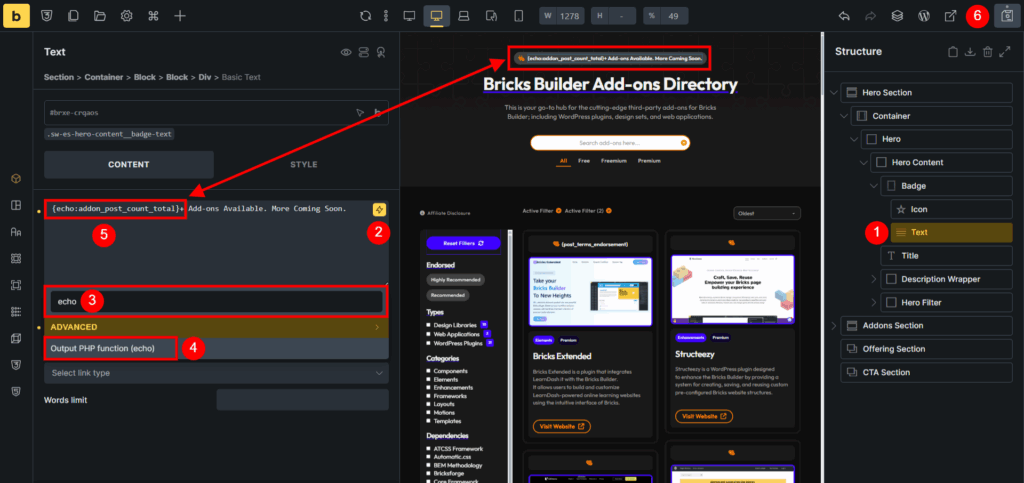
In Bricks Builder, edit the page or template where you need the count, add a Basic Text element (or any element that supports dynamic content) to the spot where you’d like to show your post count; usually in a badge, header, or section above your directory heading, just like I did (see the screenshot).
Step 2: Add Your Echo Tag:
With the element selected, switch to the Content tab and in the editor, find the dynamic tag “Output PHP function (echo)” by clicking the lightning bolt icon or simply enter the following syntax “{ echo:sw_post_count_total }” (remove the extra space from before and after the text) to call your custom PHP function with Bricks’ echo tag.
Replace sw_post_count_total with your actual function name (e.g., sw_product_count_total) if you customized it.
This tells Bricks to display the output value from your function, in my case, the total published ‘addon’ posts.
Step 3: Style As Needed
Format your heading, badge, or other UI elements around the tag so your count fits your design. You can check my directory page for the inspiration.
Add your own wording, icons, or style so your count blends nicely with the design.
Example: { echo:sw_addon_count_total }+ Add-ons Available. More Coming Soon. Which outputs the result “30+ Add-ons Available. More Coming Soon.” as a screenshot below.

Step 4: Save and View
Publish your Bricks editor changes and view your page. The count will now update automatically as posts are published, trashed, or deleted; always fresh, always accurate.
Pro Tip:
- All cache clearing, caching, and integration are handled for you, preventing delays or outdated totals; just update the three main areas: function name, cache key, and post type.
- For a different post type, simply duplicate the snippet and adjust the three required areas as I explained above.
- Using FluentSnippets (or any snippet plugin) keeps you organized and safer than editing theme files.
This is the simplest, most flexible way to show total post count in Bricks Builder; the method is secure, doesn’t slow down your site, and only requires you to touch a few lines of code customization, which I already explained above step-by-step.
Conclusion
In this tutorial, I showed you how to display the total published post count in Bricks Builder using a custom PHP function in WordPress, and how to call that data anywhere on your site with a simple dynamic echo tag offered by Bricks.
I hope you found this article helpful! If so, consider sharing it with your fellow Bricks users so they can benefit from this feature too.
If you’re ready to implement this on your Bricks-powered website, go ahead and give it a try, and if you have any questions at all, feel free to drop them in the comments below. I’m always happy to help.
And if you’d like me to implement this feature on your website or a client’s site, you can reach out by filling in the contact form on my agency website, or just send me a message on Facebook; I’m almost always online there!
Thanks so much for sticking around and visiting my site.


